Billing
Claims
Add a header to begin generating the table of contents
List Unbilled Encounters
- Click Billing > click Generate Claims (see reference)
- Specify the correct date range
- Find Print Option > select the Reprint Unpaid Claims option
- Click Print
Verify Patient Info
- Open the patient’s summary > click Patient Notes
- Open the Patient Registration Form > click Exit
- Click Patient Profile
- Verify the details match the registration form
Verify Insurance Info
- Open the patient’s summary > click Patient Profile
- Verify the details match the insurance card
Verify Encounter, Provider, CPTs & ICD10
- Open the patient’s summary > click Patient Notes
- Open the relevant document > click Exit
- Click the related entry below the correct summary section (e.g. Encounter, Diagnosis, CPT, etc.)
- Or click the correct summary section title to open that tab in patient timeline window > find the related entry
- Or click the Timeline tab to open the patient timeline > find the related entry
- Verify the details match the patient note
Create Superbill
- Open the patient’s summary > click the $ symbol next to the correct encounter to open the Claim Entry window
- Click the Superbill tab (see reference) > enter the Ecounter, Diagnosis, and CPT data, as well as the amount collected and any recall or notes
Create New Claim
- Open the patient’s summary > click the $ symbol next to the correct encounter to open the Claim Entry window
- Click the Superbill tab (see reference) > verify the Encounter, Diagnosis and CPT data > click New
- Verify each CPT code has a diagnosis pointer, fee and POS (default POS is 11) > click Create Claim
- Click Save
Open / Edit Existing Claim
- Open the patient’s summary > click the $ symbol next to the correct encounter to open the Claim Entry window (see reference)
- Add new data or modify the existing data
- Click Save
Remove Claim
- Open the patient’s summary > click the $ symbol next to the correct encounter to open the Claim Entry window (see reference)
- Click the Remove Claim link
- Click Yes to confirm
- Click the correct entry below the encounter section
- Or click the encounter section title to open that tab in patient timeline window > find the relevant entry
- Or click the Timeline tab to open the patient timeline > find the relevant entry
- Uncheck the Billed box for the removed claim
Print Individual Claim
- Open the patient’s summary > click the $ symbol next to the correct encounter to open the Claim Entry window (see reference)
- Click the Print Claim link
- Find Claim Form > select the correct format option > click Print
Print Individual Statement
- Open the patient’s summary > click the $ symbol next to the correct encounter to open the Claim Entry window
- Click the Print Statement link
- Select the correct options from the Select Parameter window click Ok
Sending Claims
Add a header to begin generating the table of contents
Print Batch Claims
- Click Billing > click Generate Claims (see reference)
- Specify the correct date range
- Find Payer > select the correct option
- Find Print Option > select Print Pending Claims
- Click Print
Print Batch Claims by Insurance
- Click Billing > click Generate Claim (see reference)
- Specify the correct date range
- Find Payer > select the correct option
- Find Print Option > select Print Pending Claims
- Find InsPlan > select the correct insurance plan
- Click the Print button
Reprint Batch Claims
- Click Billing > click Generate Claims (see reference)
- Specify the correct date range
- Find Payer > select the correct option
- Find Print Option > select Reprint Pending Claims
- Click the Print button
Upload Batch Claims to Clearing House (OfficeAlly)
- Find the claim file (OfficeAlly_mmddyyyy.txt) generated by the EMR
- Upload the claim file to the clearing house
Check Claim Status (ERA)
- Click Billing > click ERA (see reference)
- Expand the correct date
- Select the correct claim
Posting
Add a header to begin generating the table of contents
Create Batch Posting*
- Click Batch Posting (see reference)
- Click New > choose either Insurance / Patient Payments
- Enter the patient’s account number
- Or enter the claim number
- Verify the correct DOS (date-of-service) is shown
- Or find DOS > select the correct date
- Find Payment > enter the correct amount
- Find Adjustment > enter the correct amount
- Click the Post button
- Repeat steps 1 – 7 for the next payment
- Click Save
Open Batch Posting
- Click Batch Posting (see reference)
- Click Open
- Enter the account number > specify the date range > click Search
- Double-click the correct batch posting to open it
Tips:
- The system will automatically select the DOS after entering the account / claim number. It may not always be correct. (see step 4A)
- Each posting will create a new entry in the ledger using the Payment and Adjustment values.
- If the Adjustment box is left empty the system will automatically fill in the amount needed to balance the claim.
- Use the tab key to move from one box to the next.
Change Claim Format
Add a header to begin generating the table of contents
Print Guide Page
- Click Billing > click Edit Print Forma (see reference)
- Select the correct form > click the Print Guide Grid button
- Click the Print button in the browsers print window
Adjust Claim Format
- Click Billing > click Edit Print Format (see reference)
- Select the correct form > click Local Printer Adjustment
- Follow the instructions to align the claim to the form
Fix Mapping Procedure Errors (Office Ally)
- Login to OfficeAlly
- Find the Rejected queue > check the reason for rejection
- Verify the data
- If the claim and submission data do match request support
- If the claim and submission data do not match reconcile the errors and resubmit
Reference Guide
Add a header to begin generating the table of contents
Generate Claims Window
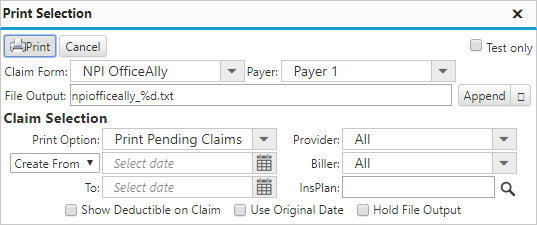
- Claim Form: selects claim format option
- Payer: selects payer option
- Test Only: sweeps claims without affecting the pending status of the claim
- File Output: displays the files name
- Append: adds the current output to the most recent previous output
- Option: selects which of the previous outputs to append the current output
- Print Option: selects the print option (e.g. Pending, Unpaid, All claims)
- Provider: selects the provider
- Create From: selects which date to begin the sweep
- To: selects which date to end the sweep
- Biller: selects the biller
- InsPlan: enter or search for the insurance provider
- Show Deductible on Claim: displays the deductible on the claim
- Hold File Output: holds the file output instead of automatically downloading it
Ledger Tab

- Add: creates a new ledger entry
- Edit: edits the selected region
- Save: saves current entries, selections and changes
- Cancel: cancels current selections
- Delete: deletes the selected entry
- Search: searches the ledger’s entries
- Print: prints the ledger
- Preview: displays a print preview of the ledger
- Clone: clones the last entries data
Charge Entry – Claim Entry Tab
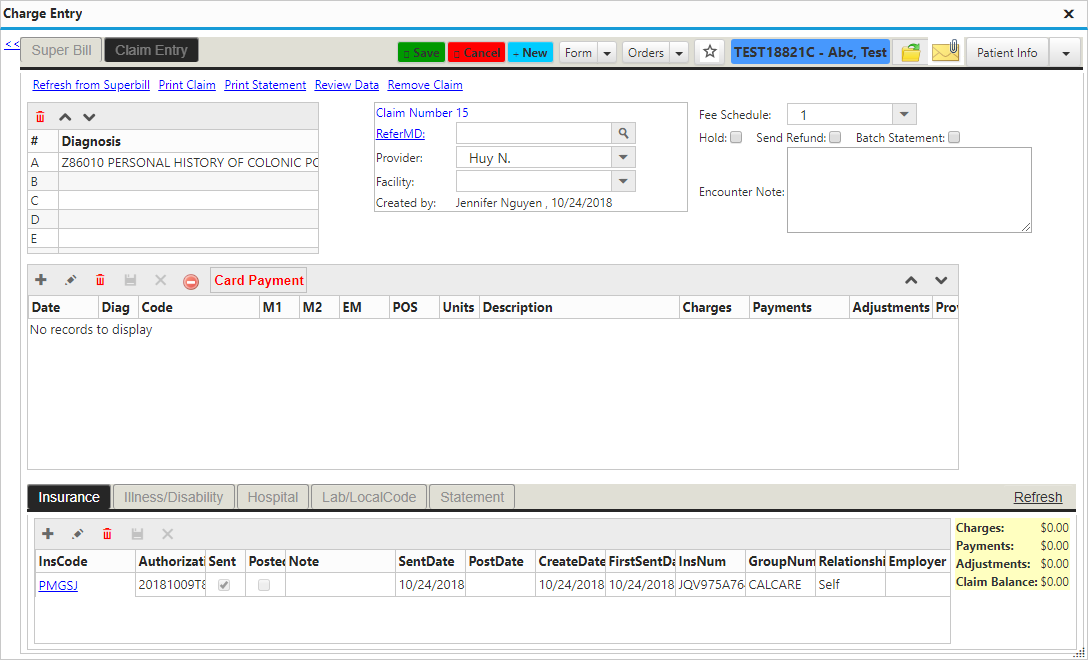
- Save: saves current entries, selections and changes
- Cancel: cancels current selections
- Form: selects a form to be opened and filled (see configuration)
- Orders:
- eLab Order: opens the lab order window
- Cloud eRx: opens the eRx window
- Cloud Rx History: displays the patient’s eRx history
- Open Patient Chart: opens the patient’s chart
- Message Patient: creates and opens a blank message related to the patient
- Patient Info: opens the patient info window
- Print Claim: downloads the claim according to the users print selection
- Print Statement: generates a statement for printing according to the users selections
- Remove Claim: deletes the current claim
- ReferMD: selects and displays the referring MD
- Provider: selects and displays the provider
- Facility: selects and displays the facility
- Card Payment: opens the payment window for processing payments via Bluefin
Advanced Configuration
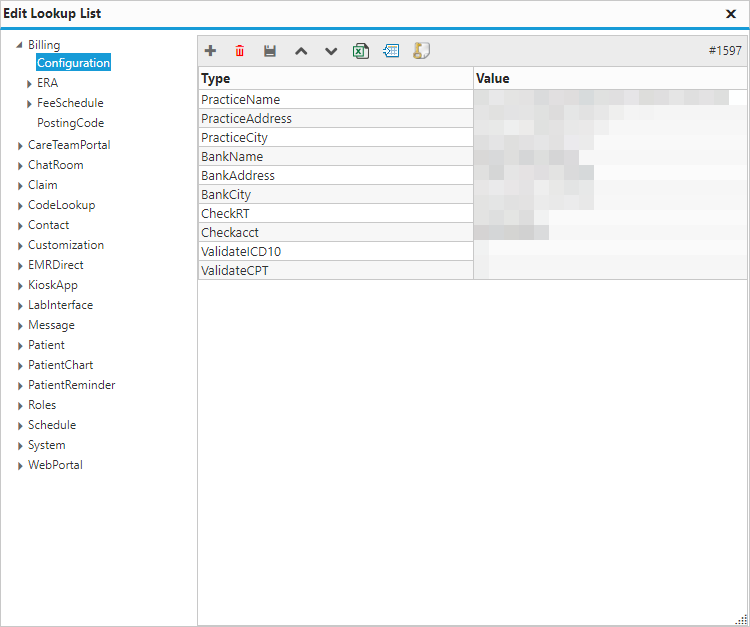
Configure Billing Information
- Click Settings > System Configurations > expand Billing > click Configuration
- Enter the necessary billing information (e.g. PracticeName, PracticeAddress, CheckRT, ChechAcct, etc.)
- Click the Save button
Configure Superbill Templates
- Click Settings > System Configurations > expand PatientChart > click Superbill
- Click the add button to add items to the Superbill template
- Click the Save button
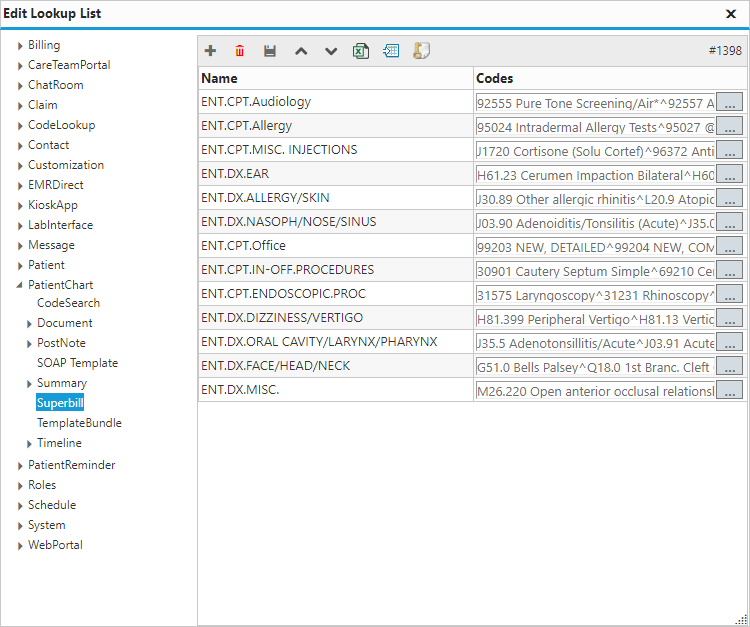
- Name: Use the following naming schemes:
- For procedure (CPT) codes use ‘template-name.cpt.section-name’
- For diagnosis (ICD) codes ‘template-name.dx.section-name’
- Code: Search for the correct procedure or diagnosis codes
- Or enter them manually