User Guide
Telehealth
System Requirements
Before you begin using your clinic’s TeleHealth service, be sure to check the following requirements
and recommendations:
Required:
- Browser: Google Chrome
- Internet Service: at least 15mb/s (check speed)
- Pass Camera and Microphone Test, here
- If anything is highlighted in red contact the clinic for support.
- If everything is either green or yellow you can your confirm appointment by text or email
- Perform a test appointment between MD and staff member
HIPPA Compliance
HIPAA guidelines on telemedicine are contained within the HIPAA Security Rule and stipulate:
- Only authorized users should have access to ePHI.
- A system of secure communication should be implemented to protect the integrity of ePHI.
- A system of monitoring communications containing ePHI should be implemented to prevent accidental or malicious breaches.
LiquidEMR accomplishes both 1 and 3 through integration with its EMR solution, which controls access and allows audits in accordance with HIPPA guidelines. LiquidEMR’s TeleHealth solution achieves total compliance by (1) encrypting all transmitted data, (2) only allowing access to the saved chat messages and physician notes via the secure EMR, and (3) not recording any audio or video.
TeleHealth Appointment
Add a header to begin generating the table of contents
Create TeleHealth Appointment
- Verify the patient has an email or phone in their profile (see open / edit existing patient profile)
- Create an appointment (see create appointment)
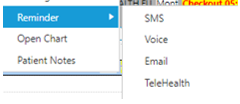
- Right-click the appointment > click Reminder > click TeleHealth
Confirm / Cancel Appointment
- Wait for the patient to confirm/cancel the TeleHealth appointment; the schedule status will update
- When a patient schedules a TeleHealth appointment they will receive text to confirm by replying Y or cancelling by replying N
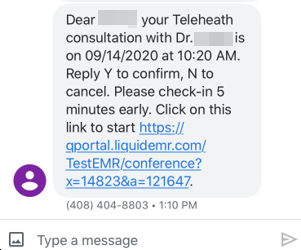
- If the patient confirms, the schedule will display “telehealth, confirmed” on the appointment

- If the patient cancels, the schedule will display “telehealth, cancelled” on the appointment

- If the patient has not confirmed or cancelled, the schedule will display “telehealth, queued” on the appointment
- If the patient confirms, the schedule will display “telehealth, confirmed” on the appointment
- If the patient does not confirm or cancel the appointment you will need to reach out manually to update the status of their appointment
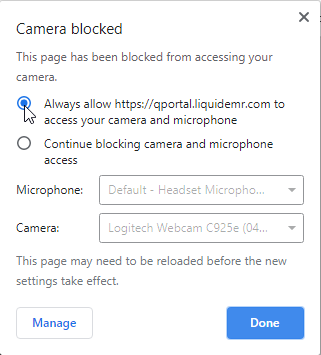
Allow Camera & Microphone Access
- Follow the link to your TeleHealth appointment
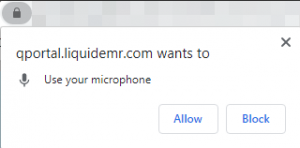
- When prompted, click Allow (see picture), in the upper left-hand corner of the Chrome window
- If you are not prompted, click the camera icon in the upper right-hand corner > click “Always allow *website address* to access your camera and microphone” (see picture)

- If you are not prompted, see Enable “Ask Before Accessing”
- If you are not prompted, click the camera icon in the upper right-hand corner > click “Always allow *website address* to access your camera and microphone” (see picture)
Start TeleHealth Appointment
- Click Schedule
- Find the correct appointment > click the TeleHealth link on that appointment (see picture)

Capture Patient Photo
- Confirm the patient’s face is well-lit and centered in the frame
- Click the capture patient picture button (see picture)

Share Screen
- Click the screen sharing button () > select which screen, application (window) or Chrome tab to share with the patient
- The patient will now be able to see whatever you’ve selected. Be conscious of any sensitive information.
Access TeleHealth Chat & Notes
- Open a Patient Summary (see open patient summary) > click Timeline
- Click TeleHealth > find the correct entry

Fix “Could not connect to Twilio: Requested device not found”
This occurs when your computer cannot detect your camera. Follow the steps below to fix this.
- If your camera is external (i.e. connects via USB, bluetooth, etc.), check that your camera is connected to the computer.
- If your camera is internal (i.e. permanently connected), check that it is working, by the following methods.
- Open another program that you have used your camera with previously (e.g. Skype, FaceTime, etc.) and test the camera.
- If the camera does not work contact the seller for support, otherwise contact the clinic for support.
- Or open your computer’s native (i.e. installed by the manufacturer) camera app and test the camera.
- If the camera does not work contact the seller for support, otherwise contact the clinic for support.
- Open another program that you have used your camera with previously (e.g. Skype, FaceTime, etc.) and test the camera.