Inbox
Inbox
Add a header to begin generating the table of contents
Other Sections
Add a header to begin generating the table of contents
The Inbox section is where all the incoming faxes are placed which should be checked daily. There are several key functions which can be performed within this section such as routing documents to different places, extracting pages within a document, or stamping.
Inbox Tab Location
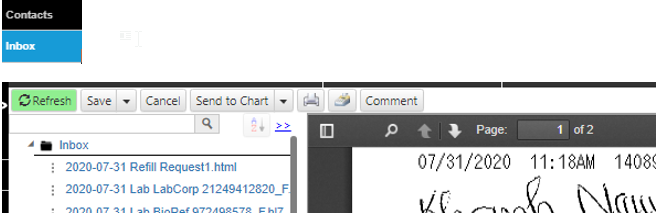
Click the Inbox tab from the left side panel for archive in inbound faxes
Folder operations: Click the folder icon to perform functions
- New Document: creates new document
- New Folder: creates new folder
- Delete Folder: deletes folder
- Download Folder: downloads folder
- Merge Documents: merges between documents
Folder operations (cont’d): Click desired document > the icon to perform said functions
- Rename document: renames document
- Delete document: deletes document
- Export document: exports document into new tab
- Extract pages from PDF: can select a range of pages within PDF
- Select document: copies document into Selected Documents folder where users can scan multiple documents at a time
View Inbox
- Click the arrow on the left side of Inbox to open/close any folder within the inbox

- Click document once for quick preview
Route Document to Patient
- Review a document > click Send to Chart icon to open the “Patient Lookup” window

- (Advance) by default, we route document to chart. You have the option to copy to chart instead and keep the current file in the same location

- Enter the patient name, date-of-birth, or chart number > click Search Patient
- Or click New Patient to create a new patient
- Double-click the correct patient
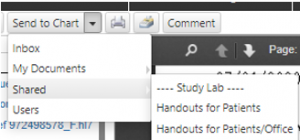
Route Document to Shared
- Click the Send to Chart Dropdown and select Shared > correct destination
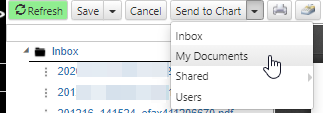
Route Document to My Documents
- Create an appointment > check the Recurrence box > configure the recurring appointment with the additional options
- Click Save and Close
Print Document
- Review a document > click the print icon

Fax Document
- Review a document > click the fax icon

- Refer to Selecting Recipients in eFax section for reference
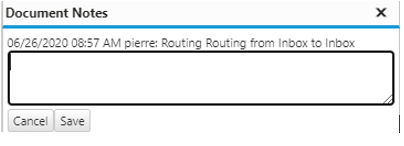
(Optional/Advanced) Comment Document
- Click the comment icon
- Document Note window > click the > enter your comment > save
Personalization
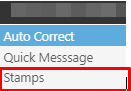
Stamps
- Click the clinic’s name at the top of the screen > click Stamps
- Click the + button to add space for a new stamp > under Stamp Name enter the stamp’s name
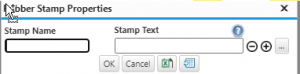
- Press the + or – icon to add or delete a new row > click ok or cancel
- Can export or import stamp list by clicking icons adjacent to cancel
- Or you can right click to pull up a similar window to edit, add, or delete stamps
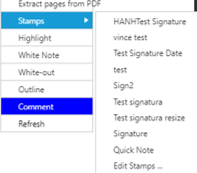
- Or click the … > click Choose File to select the stamp file > click Upload
- BITMAP Stamping
- Follow steps to open stamping
- Click the 3 dot icon on the right of each row
- Select Choose File icon to browse files in computer > Upload
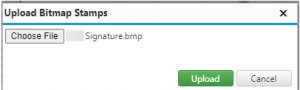
- The signature should populate > ok > save
- For resizing repeat steps 1-3 > Use – or + icons to resize > ok > save

- BITMAP Stamping
- Click Ok to save and exit
Reference Guide
Inbox Toolbar
![]()
- Refresh: refreshes the patient Inbox with the most up-to-date data
- Save: saves changes made to the current document
- Save, On Hold: creates a task with the current document as an attachment to remind the user it is unfinished before saving changes made to the patient note
- Download Chart Notes: opens the “Select File(s)” window to choose which documents to download
- Rename Document: renames the current document
- Export Document: downloads the current document
- Merge Documents: opens the “Merge Documents” window to combine multiple chart notes
- Extract Pages from PDF: splits PDF files into multiple documents
- Delete Document: deletes the current document
- Cancel: cancel changes made to the current document
- Send to Chart: opens the “Patient Lookup” window to select to which chart to route, link or copy the current document
- Inbox: moves the current document to the “Inbox”
- My Documents: moves document to the selected destination in “My Documents”
- Shared: moves the current document to the selected destination in “Shared”
- Print: prints the current document
- Fax: faxes the current document (see eFax)
- Comment: opens the “Document Notes” window to comment on the current document