Mobile EMR App
Installation & Login
Add a header to begin generating the table of contents
Other Sections
Add a header to begin generating the table of contents
iOS (Apple)
- Open the App Store
- Search for LiquidEMR Mobile > tap Get
Android (Samsung, Google, Motorola etc.)
- Open the Play Store
- Search for LiquidEMR Mobile > tap Install
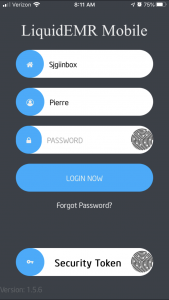
How to Login
- Open the app > enter the same clinic name, username and password as with the the full Cloud EMR > tap Login Now
Schedule
Add a header to begin generating the table of contents
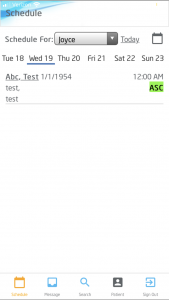
Filter Schedule View
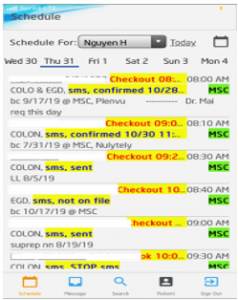
- At the top center of the screen you will see “Schedule for” and which provider the schedule is filtered for
- If you select the drop down list next to who the schedule is for, there will be a list of providers to choose from
- To view a different day, select one of the other dates for the week
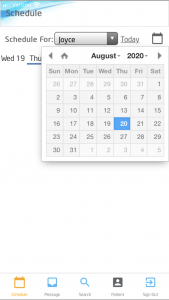
- You may also select a different date to view by clicking this icon which will display a full calendar
- The today button next to the calendar will take you back to display only appointments for the current day
- Listed on the majority of the screen you will see all appointments scheduled for that current day and the status of the appointments
- If you click on an appointment, the app will redirect you to the patient section of the app
- Expand the Schedule For drop-down > select the correct schedule
View Schedule Date
- Click the Calendar icon > select the desired date
- Or select a day of the week from the list above the schedule
- Or select a day of the week from the list above the schedule
Patient Chart
Add a header to begin generating the table of contents
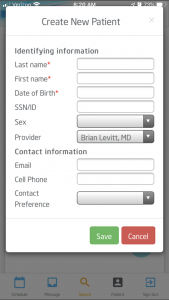
Create New Patient Profile
- Click Search > click the + button
- Enter the patient’s details
View Patient Notes
- Tap Search > enter the patient’s name, date-of-birth or account number
- Or tap Schedule > find the patient’s appointment
- Tap the correct name to open that patient’s notes

- The Insurance category is where insurance card and verification documents are kept
- The Non-Clinical category is where non clinical forms are kept
- For example, ID Card and Check out form PDF’s
- The Clinical category is where procedure and discharge documents are kept
- The Prescriptions category is to view medication prescribed for the patient
- The Personal Category is for the patient picture and other personal documents are kept
- To change the patient picture click on the patient photo in the upper right hand corner

- The Lab/Imaging category is to display any lab and imaging results for the patient
View Patient Timeline
- Tap the correct name to open that patient’s notes
- Tap Timeline to view that patient’s timeline

- Encounters show the details of when patients came in, what facility they went to, and who they saw
- Vitals are where patient health information is displayed
- Authorization shows the authorization for their appointment and prodcedures done
- Ledgers display billing information
- Diagnosis show the outcome of the procedure or health condition treated for
- CPT shows what procedures have been done for patient
- History shows medical history of patient
- Allergies display allergies patient has listed on their profile

- Labs display labs done for patient
- LabResult is the result for labs done for patient
- Immunization are vaccines given to the patient
- Procedures are procedures done for patient along with the result
- Referral displays any referral the patient has for another facility
- Message displays messages to the patient

- Journal is notes about the patient
- LabSummary is overview of patient labs and results
- Appointments are current and past appointments scheduled for patient
- Claims are for patient billing information
- Bill is patient billing information
Messages
Add a header to begin generating the table of contents
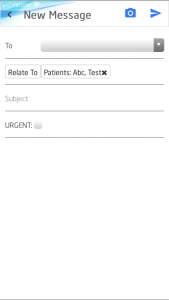
Compose a Message
- Tap Message
- Tap Compose
- Select a recipient > compose a message > tap Send icon
Send an Attachment
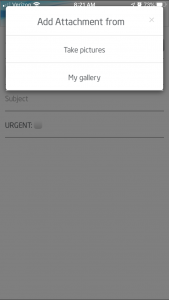
- Tap Compose
- Select a recipient > compose a message > tap the Camera icon
- Select the correct attachment
- Tap the Send icon
Reference Guide
Add a header to begin generating the table of contents
Schedule
- Schedule For: selects which schedule to display
- Today: displays the schedule for today
- Calendar: selects a date to display the schedule for
- Dates: selects which day out of the next 7 to display the schedule for
- Appointments: displays the appointments on the selected date
Messages

- Inbox: will display messages sent to you with the subject, date, and time received
- Todo: will display messages you have not yet adressed
- Sent: are messages you have sent
- Trash: are messages you have thrown away
- Forwarded: are messages you sent to another outside user
- Replied: are messages you have responded to
- Patient Msg: are messages from patients
- To open a message click on it, and once opened a toolbar will be displayed
Search
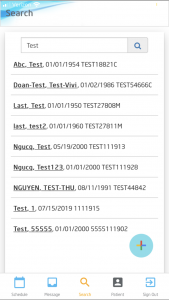
- Inbox, Sent, Trash, etc: selects which folder to display messages from
- Compose: opens a “New Message” screen
- Messages: displays messages in the selected folder
Patient Notes
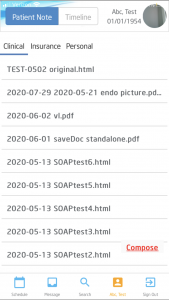
- Patient Note / Timeline: switches between the patient’s chart and timeline
- Patient Photo: enlarges the patient photo
- Clinical, Insurance, etc: selects which folder to display patient notes from
- Patient Notes: displays patient notes from the selected folder
Patient Timeline
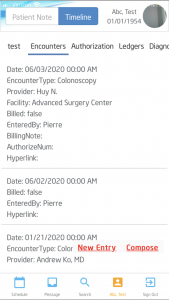
- Patient Note / Timeline: switches between the patient’s chart and timeline
- Encounters, Authorization, Ledgers, etc: selects which section to display patient data from
- Patient Data: displays patient data from the selected section
- New Entry: creates a new entry in selected section
- Compose: opens the “New Message” screen with the current patient in the “Related To” field