Messaging & Tasks
Messages
Add a header to begin generating the table of contents
Compose a Message
- Click Messages
- Click New Message
- Compose a message
- Click Send
Send an Attachment
- Click Messages
- Click New Message
- Compose a message > click Relates To > find the correct patient (see reference)
- Click Attachments > select the correct patient note(s) > click Ok
- Click Send
Open a Messages
- Click Messages
- Click Inbox > double-click the correct message to open it
Sort Messages
- Click Messages
- Click Inbox > click a column heading (e.g. From, To, Subject, etc.) to sort by it
- Or click the same column heading again to reverse it
- Click the Clear button to reset it
Search Messages
- Click Messages
- Click Inbox > enter the search criteria in the search box
- Or click a column heading (e.g. From, To, Subject, etc.) to search by it
- Click Search Message
Open an Attachment
- Click Messages
- Click Inbox > double-click the correct message to open it
- Find Attachment(s) > click the adjacent hyperlink
Reply to a Message
- Click Messages
- Click Inbox > click the correct message to select it
- Click the Reply button > compose a message > click Send
Forward a Message
- Click Messages
- Click Inbox > click the correct message to select it
- Click the Forward button > enter the recipient(s) > click Send
Delete a Message
- Click Messages
- Click Inbox > click the correct message to select it
- Click the Delete button to delete it
Journal a Message*
- Click Messages
- Click Inbox > click the correct message to select it
- Click the Journal button to move it to the patient summary, under the Journal section
Move a Message
- Click Messages
- Click Inbox > click the correct message to select it
- Select the destination folder from the drop-down > click Move to
Print Message List
- Click Messages
- Click Inbox > click the correct message to select it
- Click the Print button to print it
Folders
Add a header to begin generating the table of contents
Create Folder
- Click Messages
- Click the top folder icon > click New Folder to open the “New Folder” window
- Enter the new folder’s name > click Add New Folder
Rename Folder
- Click Messages
- Click the folder icon adjacent to the relevant folder > click Rename Folder
- Enter the new folder’s name > click Rename
Delete Folder
- Click Messages
- Click the folder icon adjacent to the relevant folder > click Delete Folder
Reference Guide
Add a header to begin generating the table of contents
Inbox Section
![]()
- From: displays sender
- To: displays the recipient(s)
- Subject: displays the subject of the message
- Received: displays when the message was received
- Reference: hyperlink to relevant patient’s chart
- Due: displays when the due date of the task
- Paper Clip: shows whether the message contains an attachment
- Read Date: displays when the message was read
Message Window*
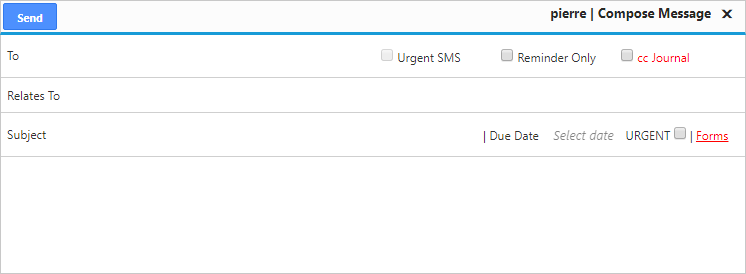
- To: enter to whom the message will be sent
- Relates To: enter to which patient the message relates
- Subject: enter the subject of the message
- Attachments: selects which patient notes to attach to the message
- cc Journal: adds this message to the patient’s Journal
- Forms: selects which forms to attach to the message
Messages Toolbar*
![]()
- New Message: creates a new message
- Refresh: refreshes the Inbox with the most recent messages
- Delete: deletes the selected message
- Unread: marks the selected message as unread
- Print: prints the selected message
- Chart: opens the related patient’s chart of the selected message
- Forward: forwards the selected message
- Reply: replies to the selected message
- Journal: moves the selected message to the patient’s Journal
- All: toggles between showing “All” messages, or only messages from either patients or the care team
![]()
- Move to: selects a folder to move the selected message
- Filter: filters messages according to the user’s selections
Advanced Configuration
Add a header to begin generating the table of contents
View Users Messages
- Click Messages
- Click the drop-down beside the current user’s name > click the correct user to view that user’s messages
Configure Routing Rules
- Click Settings > click System Configurations > expand Message > click Configuration

- Action: enter the action witch which to route a message
- Value: enter where to route a message for a specific action
Configure Color Rules*
- Click Settings > click System Configurations > expand Message > click ColorCode
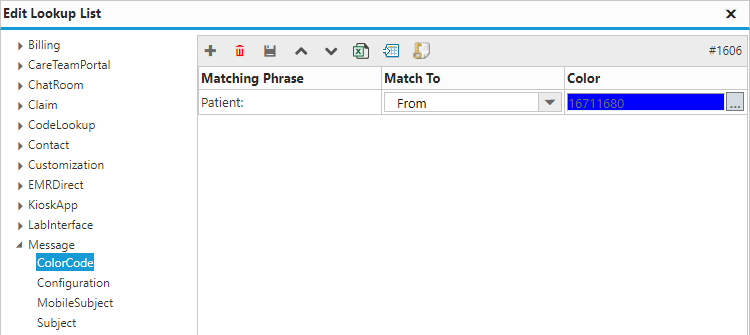
- Matching Phrase: enter the keyword or phrase to associate with the color
- Match To: select which field of a message to match to the matching phrase
- Color: select the color to associate with the keyword or phrase
Configure Subject Options
- Click Settings > click System Configurations > expand Message > click Subject
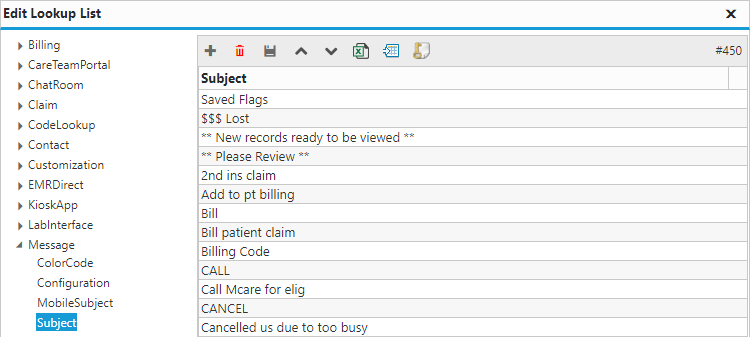
- Subject: enter the name of the option